Chapter 10: Instructions and Manuals
The Importance of Clear Instructions
Imagine you’re faced with a difficult new task and a strict time limit. You start by carefully reading the instructions, but soon get stuck and can’t move forward. You try several times, guessing what might be missing or what a step really means. After repeated failed attempts, frustration sets in—and you abandon the task altogether.
Most of us have experienced this kind of situation at least once. In everyday life, the consequences are usually minor—perhaps a piece of furniture left half-assembled or a recipe that didn’t turn out as expected. In engineering, however, unclear instructions can have far greater effects, compromising safety, functionality, user satisfaction, and even a company’s reputation.
As an engineer, you’ll design products, systems, and structures that shape the modern world. These may range from intricate devices to large-scale infrastructure projects—all intended to improve everyday life. However, your role doesn’t end with creation. You must also communicate effectively with the people who will use what you build. Even the most innovative design can fail if users don’t understand how to operate it correctly.
Considering the Audience for Technical Instructions
Before you begin writing your instructions, conduct an audience analysis. Understanding who will use a product or tool greatly influences how you communicate the steps. For example, if you were writing instructions on how to create a flowchart using new software called LogicNest Pro, would you begin by explaining how to download the software, or would you start directly with creating data flow diagrams? If your audience were first-year engineering students with no prior experience, you would likely start with downloading and installing LogicNest Pro. However, if your readers were experienced system designers transitioning to a new tool, you might begin with creating the data flow diagrams. This difference in audience knowledge and experience highlights the importance of providing clear, audience-tailored instructions.
With the question of audience in mind, consider these poorly written first aid instructions for those outside the medical field who may be faced with a choking victim:
More difficult to understand: Perform Heimlich maneuver and prepare for possible tracheal intubation if airway obstruction persists.
This instruction is ineffective for readers outside the medical field because it uses technical terms such as Heimlich maneuver and tracheal intubation without explanation. It assumes prior medical knowledge and omits essential sub-steps. Instructions in this case should use plain language and include enough detail for the audience to understand and act confidently.
Easier to understand: To help someone who is choking, follow these steps:
- Stand behind the person.
- Wrap your arms around their waist.
- Make a fist with one hand and place it just above their belly button.
- Grasp your fist with your other hand.
- Deliver quick, upward thrusts into the abdomen until the object is expelled or the person can breathe again.
- If the person becomes unconscious or the blockage does not clear, call 911 immediately.
These instructions are easier to understand because they
- provide step-by-step guidance using clear and simple language;
- break down the actions into easy-to-follow steps without using medical jargon;
- explain medical terms, such as Heimlich maneuver, in plain language; and
- describe physical movements in detail, so the reader knows exactly what to do at each stage.
Writing Effective Lead-ins
A lead-in is an opening sentence or short paragraph that gives readers a clear idea of what to expect next. Before presenting step-by-step instructions, it’s helpful to explain why the task matters and what it will accomplish. A strong lead-in prepares readers, provides essential context, and helps them understand the purpose and scope of the procedure before beginning the steps. Consider the following example:
Starting the Cleaning Cycle
In this step, you will start the automated cleaning process using the Vertex mobile app. The precision water jets will activate and begin spraying the cleaning solution ahead of the cleaning path. The microfiber pads will rotate and apply pressure based on sensor feedback. The system will move across the entire window, cleaning in a predefined pattern generated by the microprocessor control unit.
Note: The cleaning path is optimized automatically based on window size and shape detected during calibration.
In the example above, the lead-in helps readers by:
- explaining the purpose (starting the automated cleaning process);
- identifying the tool they’ll use (Vertex mobile app); and
- setting expectations for what they’re about to accomplish (to start the cleaning cycle).
Presenting Known Information Before New
A key feature of well-designed instructions is that they present known information before introducing new concepts. By connecting new information to the familiar, you create a logical progression that helps readers build their understanding step by step. You also reduce confusion that can arise when readers encounter unfamiliar procedures.
Consider the following two examples:
More difficult to understand: Perform signal conditioning on the raw sensor data before you analyze bioelectrical measurements.
Easier to understand: Before you can analyze the bioelectrical measurements, perform signal conditioning on the raw sensor data.
In this version, we start with familiar information (analyzing bioelectrical measurements) before introducing the new concept (signal conditioning). This approach helps the reader transition smoothly to new ideas from a familiar foundation.
Writing Instructions with Clarity and Precision
When presenting steps, use clear and direct language. Precise wording and simple sentence structures help readers follow procedures confidently, without hesitation. Clear language also eliminates ambiguity that could lead to errors. This is especially important when readers must perform tasks quickly or under pressure.
Consider the following two examples:
Indirect and confusing: The technician should adjust his or her equipment settings according to the specifications.
This instruction is weak because it addresses the technician in third person (the technician), which creates distance between the instruction and the reader. It also uses gendered pronouns (his or her), which are unnecessary and can make instructions feel dated or exclusionary. Additionally, the phrase should adjust sounds less like a direct command than the imperative adjust, making it less clear whether the step is required. Finally, according to the specifications is vague. Which specifications? Where are they located? This may force readers to search for additional information before they act, leading to wasted time.
Direct and clear: Adjust your equipment settings to 50 Hz frequency and 120V input.
This version is stronger because it uses an imperative verb (command) to provide clear direction, removes redundant or cluttered wordings, and includes the required values (50 Hz frequency and 120V input), eliminating confusion about which settings to use.
The following strategies can help you write clear instructions.
Use imperative verbs for actionable steps: Direct instructions make tasks clear and easy to follow, guiding readers toward the exact action they need to take.
Instead of
The cable should be connected to port A.
write
Connect the cable to port A.
Choose concrete words: Specific measurements and values eliminate guesswork. Replace vague terms with precise alternatives.
Instead of
Adjust the settings appropriately.
write
Set the frequency to 50 Hz.
Keep sentences short and simple: Short and simple sentences make instructions easier to process and reduce the chance of reader error.
Instead of
It is important to connect the cable to port A.
write
Connect the cable to port A.
Use consistent terminology: Choose one term for components and actions and use these throughout your instructions. If you call something a control panel in step one, don’t refer to it as a dashboard in the next step. Consistent terminology reduces misunderstandings.
Include only necessary details: By including only the essential information, you keep instructions focused and prevent readers from getting distracted by irrelevant details. Provide essential information, such as safety warnings and specific measurements, but avoid cluttering instructions with background theory that is “nice to know” but ultimately unnecessary.
Instead of
Before connecting the power supply (which converts AC to DC using transformer technology), ensure the voltage is set to 12V.
write
Before connecting the power supply, set the voltage to 12V.
Use affirmative phrasing: Affirmative (positive) phrases reduce cognitive load and improve comprehension. Negative phrasing makes instructions harder to process.
Instead of
Do not leave any wires loose in the terminal block.
write
Tighten all wires in the terminal block.
Use parallel language: Ensure that all steps in a sequence follow the same grammatical pattern. This consistency creates a predictable pattern that helps users process information more efficiently. Consider this non-parallel example:
To set up your email account, follow these steps:
- Open the email application.
- Your account settings should be accessed.
- Entering your email address is required.
- Click the Add Account button. Your email account will now be added and ready to use.
Inconsistency in sentence structure makes these instructions harder to follow. A revision uses imperative verbs at the beginning of sentences, maintaining parallel grammar throughout the list of steps:
To set up your email account, follow these steps:
- Open the email application.
- Access your account settings.
- Enter your email address.
- Click the Add Account button. Your email account will now be added and ready to use.
Make text and visuals interact: Instructions rely heavily on visuals, such as diagrams, flowcharts, or photographs. However, visuals should not simply accompany the text. They must “interact” with it. This is especially useful in instructions because it’s often easier to show rather than tell, particularly for complex tasks.
The following instructions rely solely on text, which makes it harder for users to follow:
To access the Concordia University Library’s online resources, follow these steps:
- Go to the Concordia University Library Discovery Tool.
- Click Sign in in the top-right corner. The Sign in Selection window opens.
- Click Login with your Concordia netname and password (for current students, faculty, and staff). A sign-in window will appear.
- In the sign-in window, enter your Concordia Netname and password. Then, click Sign in.
- To verify your account, select one of the available verification options and complete the verification process. After you verify your account, you will have full access to Concordia Library’s online resources.
Without visuals to guide them, readers must interpret all navigation steps and login details, which can be confusing and overwhelming for them. Now, consider the following version with visual support.
To access the Concordia University Library’s online resources, follow these steps:
- Go to the Concordia University Library Discovery Tool (see Fig. 10.1).

Fig. 10.1 Concordia University Library Discovery Tool.
- Click Sign in in the top-right corner. The Sign in Selection window opens (see Fig. 10.2).
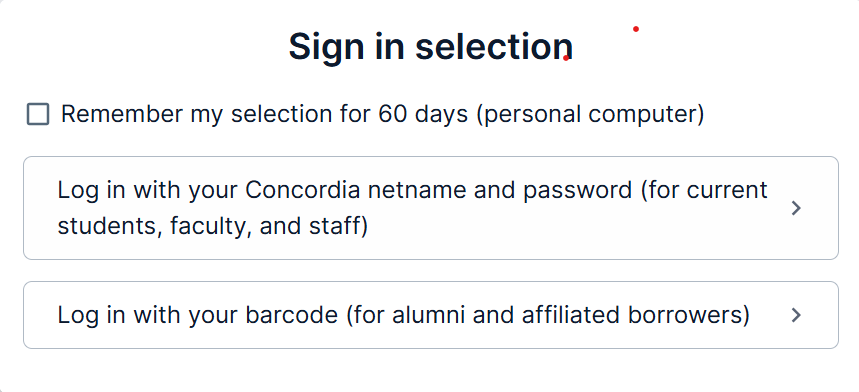
Fig. 10.2 The Sign in Selection window with Netname and password option for students, faculty, and staff.
- Click Login with your Concordia netname and password (for current students, faculty, and staff). A sign-in window will appear (see Fig. 10.3).
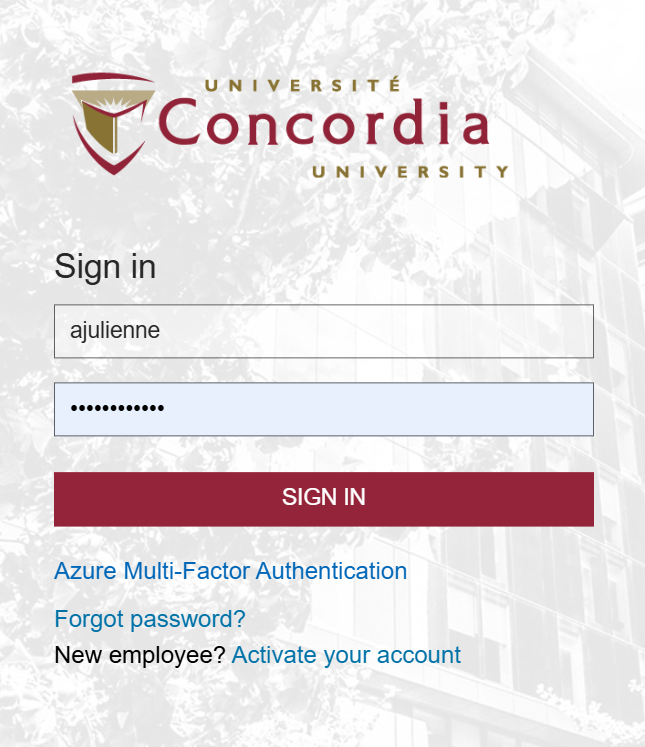
Fig. 10.3 Sign-in window for entering your Netname credentials
- In the sign-in window, enter your Concordia Netname and password. Then, click Sign in (see Fig. 10.4).

Fig. 10.4 Account verification step with available authentication options.
Note: Your Netname is your Concordia email prefix. For example, if your email is jsmith@concordia.ca, your Netname is jsmith.
- To verify your account, select one of the available verification options and complete the verification process. After you verify your account, you will have full access to Concordia Library’s online resources.
This version uses clear instructions paired with visuals that illustrate each action. The images highlight menu options and fields, helping users quickly identify what to do at each step. To use visuals effectively, consider these strategies:
- Write clear figure captions.
Fig. 10.2 The Sign in Selection window with Netname and password option for students, faculty, and staff.
- Reference visuals within the text.
The flowchart in Fig. 1 illustrates…
- Place visuals near their textual references.
The reader’s eyes should move directly from the text to the corresponding visual. If they must flip to another page in a manual or move to another screen on a website, their concentration is broken, increasing cognitive load (the mental effort required to understand the instructions). For more information on using visuals effectively, see Chapter 4: Visuals.
Emphasize safety in instructions: Safety is a critical component of effective instructions. Always inform users of potential hazards or conditions that could lead to failure. Use widely recognized safety icons to highlight potential hazards. Additionally, choose the appropriate level of warning based on the severity of the risk. The four commonly used levels of warnings are as follows:
Note: Used for non-hazard-related messages—often for equipment protection or general information. Let’s look at the following examples:
Note: Use only distilled water in cooling system.
Note: Software update required before operation.
Caution: Indicates a potential hazard that may result in minor or moderate injury or equipment damage. Let’s look at the following examples:
Caution: A brief power interruption may cause loss of unsaved data.
Caution: Wear gloves when handling sharp parts.
Warning: Indicates a potential hazard that could result in death or serious injury if not avoided. Let’s look at the following examples:
Warning: Moving parts. Keep hands clear to avoid serious injury.
Warning: Rotating shaft. Do not operate with guard removed.
Danger: Indicates an immediate hazard that will result in death or serious injury if not avoided. Let’s look at the following examples:
Danger: High voltage. Contact will cause severe electric shock or death.
Danger: Moving blades. Keep hands and clothing clear.
Provide expected results: To guide users effectively, instructions should conclude with the expected result or outcome. Ending abruptly can leave readers uncertain. For example, if your final step reads Click Finish on the pop-up window, users may wonder, “What happens next?” Instead, include the outcome: Click Finish on the pop-up window. The process completes, and your changes are saved. Clearly describing what users should see or expect at the end of a step helps them confirm whether they have completed it successfully.
Final Thoughts
Effective instructions should be
Clear: Use direct language.
Concise: Remove unnecessary words and redundant information.
Consistent: Maintain a predictable structure and vocabulary. Use parallel grammar.
Audience-appropriate: Adjust the level of technicality to match the reader’s background.
Well-supported with visuals: Use visuals to enhance understanding.
By following these principles, instructions are more likely to be clear, usable, and support safe task completion.
Writing Manuals for Usability
Manuals are essentially extended versions of instructions. They follow the same principles but tend to be more comprehensive. Common types of manuals include
- assembly manuals (e.g., guides for furniture assembly)
- owner manuals (e.g., guides for cars or appliances)
- operator manuals (e.g., guides for industrial machinery)
- service manuals (e.g., guides for maintenance and repair)
- technical manuals (e.g., in-depth engineering documentation)
All principles recommended for writing instructions apply to manuals as well.
Structuring Instruction Guides and Manuals
Include the following components in your instructions:
A clear and specific title: Your title should accurately reflect the task covered in the instructions. Ensure that it clearly communicates the action involved.
Example of a Poor Title: The Drive Head of a Laptop Computer
This title is vague and does not indicate an action or task.
Example of a Good Title: How to Clean the Drive Head of a Laptop Computer
This title specifies the task and the action involved.
A Strong Introduction: Instructions, like other technical documents, begin by establishing a broader picture before moving to specific details. The introduction provides an overview of the task or procedure, giving the reader context and establishing its importance. It outlines the overall goals and any prerequisites to help readers understand what to expect and why they should follow the instructions.
At the very least, a good introduction should include
- A definition of the overall process described
- A statement of purpose—what the process accomplishes
- Any necessary background theory or principles (if relevant to the reader)
- Tools or resources required to complete the procedure
- A list of individual steps that will be detailed in the body of the instructions
The introduction can also motivate the reader to complete the task. For example, if you are teaching readers how to back up important files, you could highlight the risks of not doing so.
Failure to back up your data may result in permanent data loss due to:
- Damage caused by extreme temperature or moisture.
- Data corruption from a power surge.
- Information scrambling due to magnetic interference.
Clearly state any assumptions about the reader’s background knowledge. This helps them determine if the instructions are suitable for them. For example, in a guide for backing up data, you might include:
To follow these instructions, you should be familiar with the following components of a Macintosh system:
- Computer
- Monitor
- Keyboard
- Mouse
- Compact disk drive and recordable disk
Additionally, define any specialized terms that appear in the instructions. For instance, imagine that you are writing instructions on how to set up an external hard drive. You might use the term initialize when describing the steps required before the drive can be used. However, this term might be unfamiliar to some readers; therefore, it might be helpful to explain what initialize means in the introductory text
The final part of the introduction should list the steps that will be covered in the body of instructions.
A Discussion of the Steps: The discussion of the steps explains how to complete each step, while providing essential background on equipment, safety, and expected results.
When describing individual steps, follow a consistent and predictable pattern to enhance readability and usability. A well-structured approach makes instructions easier to follow, improving user experience and overall effectiveness. The process should follow follows this structure:
- Define the step. Start by describing what happens in this step.
- Provide necessary information. Note any dangers, cautions, or required tools and equipment.
- Give specific directions. Clearly explain how to execute the step.
- Describe the expected result. Let the user know what should happen when the step is completed correctly.
- Transition to the next step. Provide a logical connection if there is a following step.
Effective Conclusion: Like other types of documents, instruction guides and manuals should end with a conclusion. Effective conclusions may do the following:
- Indicate that the task has been successfully completed.
- Summarize key steps in a concise manner.
- Provide resources for additional information, if applicable.
Key Takeaways

Clear instructions are key to connecting complex engineering solutions with real-world use. Well-written instructions help people complete technical tasks safely and successfully—and getting them right starts with a few core principles. The six points below can help guide your writing process:
- Know your audience. Think about who will be using your instructions, and adjust language and content based on their background, knowledge, and experience.
- Organize information logically. Provide an overview that provides context and then present steps in a natural, logical order. Start with what the reader already knows before introducing new ideas.
- Write clearly and directly. Use imperative verbs for actionable steps. Use concrete, consistent wordings throughout. Remove unnecessary details that could cause confusion.
- Use visuals intentionally. Place diagrams or images next to text they relate to, and include helpful captions.
- Handle safety warnings appropriately. Use standard labels like notice, caution, warning, and danger to match the level of risk. Avoid overloading the reader with too many alerts.
- Wrap up with a quick summary of the key steps (if needed) and direct the reader to any additional information or resources.
Whether you’re writing simple instructions or full manuals, these strategies will make your work practical and user-friendly. Remember: unclear instructions don’t just frustrate users. They can lead to equipment damage, safety risks, and even legal issues. That’s why clear communication is more than a skill; it’s a key responsibility of engineers.
Practice Task
 As a junior engineer at Trevora Consulting, you’ve just received an assignment to create a user guide. Your company has partnered with the Regional Technical Training Institute to develop user manuals for their professional development program. The institute trains experienced technicians and engineers who need to expand their expertise into new technological areas as their industries evolve.
Your project manager explains the challenge: “These professionals are skilled in their own fields, but they struggle when they encounter unfamiliar equipment. A mechanical engineer might need to operate spectroscopy equipment, or an electrical technician might need to use advanced CAD software. We need user guides that help competent technical people quickly master equipment outside their specialization. Your job is to create documentation that transforms potentially intimidating technology into accessible tools.”
She continues: “I’m giving you flexibility to select the equipment you’ll document. These could be laboratory instruments, industrial software applications, specialized measurement devices, testing equipment, control systems, diagnostic tools, or any other technical equipment you are familiar with. The important thing is that it should be something a qualified professional could learn to operate correctly with proper documentation even if it’s outside their primary field.”
Your user manual must bridge the gap between general technical competence and specific equipment. As you approach this task, consider how the principles discussed in this chapter will guide your documentation strategy. Additionally, consider the following guidelines while creating your manual.
Selecting Your Technical Object, Equipment, or System
In this assignment, you will create instructional materials for completing a technical task. A key goal is to help the audience understand the procedure in its technical details. To do so, choose a piece of technical equipment or system that you can document effectively. Your choice of medium is open. You could, for example, create a written manual (min. 700 and max. 900 words), a series of linked webpages, or a short video (4-5 minutes). Context of use will dictate the choice of medium.
You can organize your user guide in the following structure:
Introduction
- Indicate the specific task presented as well as the scope. (What will and will not be covered?)
- Give a general idea of the procedure (the big picture) and what it accomplishes.
- Indicate conditions when these instructions should (or should not) be used, considering your target audience.
General Warnings, Cautions, Dangers, and Notices
- Alert your audience to the possibility of ruining their equipment, screwing up the procedure, or hurting themselves.
- Emphasize key points or exceptions using special notices—note, warning, caution, and danger.
Equipment and supplies
Include a list of equipment—the tools used in the procedure (such as mixing bowls, hammers, drills, or screwdrivers) and materials—the substances consumed in the procedure (such as wood, paint, oil, flour, and nails).
Discussion of the steps
- Provide step-by-step instructions in the required order. For example, if you are changing the oil in a car, draining the oil is a step that must come before putting in the new oil.
- Give additional explanatory information about
- the expected result of each step;
- why the user should care about doing the step; or
- mechanical principles that allow the step to happen.
- Use graphics (pictures, illustrations, animations, etc.) to support the verbal information.
Style
- Use a direct, conversational tone.
- Imperative verbs best convey actions the user must take. Use parallel structure.